DB节点和CELL节点的升级都可以分为滚动个非滚动方式,为了节省时间,本次采用非滚动并行升级的方式。
本次升级从Exadata Image 11.2.3.1.1 升级到 Exadata 11.2.3.2.1。
数据库从Oracle 11.2.0.3 BP 8升级到 BP 16。
具体的升级步骤和过程还是要通读Oracle官方文档。
一、升级image前的准备工作
升级CELL节点需要使用patchmgr工具,首先要为patchmgr配置合适的SSH数据加密算法:
1、打开SSH的debug模式:
[root@dm02db01 ~]# ssh -v -v patchmgr_launch_node 2>ssh_client_debuglog.txt
[root@dm02db01 ~]#
这样就可以在ssh_client_debuglog.txt中查看debug信息:
[root@dm02db01 patch_11.2.3.2.1]# cat ssh_client_debuglog.txt
OpenSSH_4.3p2, OpenSSL 0.9.8e-fips-rhel5 01 Jul 2008
debug1: Reading configuration data /root/.ssh/config
debug1: Reading configuration data /etc/ssh/ssh_config
debug1: Applying options for *
debug2: ssh_connect: needpriv 0
debug1: Connecting to dm02db01.hrss [172.20.6.11] port 22.
debug1: Connection established.
debug1: permanently_set_uid: 0/0
debug1: identity file /root/.ssh/identity type -1
debug2: key_type_from_name: unknown key type '-----BEGIN'
debug2: key_type_from_name: unknown key type '-----END'
………………….
2、如果下面的命令输出结果为空,则表示需要为patchmgr设置数据加密算法:
[root@dm02db01 ~]# sed -e '/SSH2_MSG_KEXINIT received/,/first_kex_follows/!d'  \
> ssh_client_debuglog.txt | grep                              \
> 'aes128-ctr\|aes192-ctr\|aes256-ctr\|arcfour'
[root@dm02db01 ~]#
Exadata缺省没有配置特别的数据加密算法(只配置了一些数据传输的加密算法),因此,需要在/etc/ssh/ssh_config添加“Ciphers aes128-ctr,aes192-ctr,aes256-ctr,arcfour”,因为服务器需要至少其中一种数据加密算法:
[root@dm02db01 patch_11.2.3.2.1]# cat  /etc/ssh/ssh_config
#       $OpenBSD: ssh_config,v 1.21 2005/12/06 22:38:27 reyk Exp $

# This is the ssh client system-wide configuration file.  See
# ssh_config(5) for more information.  This file provides defaults for
# users, and the values can be changed in per-user configuration files
# or on the command line.

# Configuration data is parsed as follows:
#  1. command line options
#  2. user-specific file
#  3. system-wide file
# Any configuration value is only changed the first time it is set.
# Thus, host-specific definitions should be at the beginning of the
# configuration file, and defaults at the end.

# Site-wide defaults for some commonly used options.  For a comprehensive
# list of available options, their meanings and defaults, please see the
# ssh_config(5) man page.

# Host *
#   ForwardAgent no
#   ForwardX11 no
#   RhostsRSAAuthentication no
#   RSAAuthentication yes
#   PasswordAuthentication yes
#   HostbasedAuthentication no
#   BatchMode no
#   CheckHostIP yes
#   AddressFamily any
#   ConnectTimeout 0
#   StrictHostKeyChecking ask
#   IdentityFile ~/.ssh/identity
#   IdentityFile ~/.ssh/id_rsa
#   IdentityFile ~/.ssh/id_dsa
#   Port 22
#   Protocol 2,1
#   Cipher 3des
#   Ciphers aes128-cbc,3des-cbc,blowfish-cbc,cast128-cbc,arcfour,aes192-cbc,aes256-cbc
#   EscapeChar ~
#   Tunnel no
#   TunnelDevice any:any
#   PermitLocalCommand no
Host *
        GSSAPIAuthentication yes
# If this option is set to yes then remote X11 clients will have full access
# to the original X11 display. As virtually no X11 client supports the untrusted
# mode correctly we set this to yes.
        ForwardX11Trusted yes
# Send locale-related environment variables
        SendEnv LANG LC_CTYPE LC_NUMERIC LC_TIME LC_COLLATE LC_MONETARY LC_MESSAGES
        SendEnv LC_PAPER LC_NAME LC_ADDRESS LC_TELEPHONE LC_MEASUREMENT
        SendEnv LC_IDENTIFICATION LC_ALL

Ciphers aes128-ctr,aes192-ctr,aes256-ctr,arcfour
[root@dm02db01 patch_11.2.3.2.1]#
3、检查各个cell节点之间root用户安全的信任关系(ssh User Equivalency):
我这里检查的“all_group”,这个文件包含了全部的结算节点和cell节点:
[root@dm02db01 patch_11.2.3.2.1]# dcli -g all_group -l root date
dm02db01: Thu May 23 10:28:31 CST 2013
dm02db02: Thu May 23 10:28:40 CST 2013
…………….
dm02cel13: Thu May 23 10:26:37 CST 2013
dm02cel14: Thu May 23 10:26:25 CST 2013
[root@dm02db01 patch_11.2.3.2.1]#
如果root的安全信任关系没有建立,可以使用如下方法建立,否则,可以直接进入“4、检测磁盘组属性disk_repair_time配置”:
创建ssh秘钥:
[root@dm01db01 tmp]# ssh-keygen -t rsa
Generating public/private rsa key pair.

Enter file in which to save the key (/root/.ssh/id_rsa): Enter passphrase (empty for no passphrase):
Enter same passphrase again:
Your identification has been saved in /root/.ssh/id_rsa.
Your public key has been saved in /root/.ssh/id_rsa.pub.
The key fingerprint is:
07:0f:1c:6e:78:42:6d:d0:15:42:1b:ab:ea:39:23:17 root@dm01db01.scq.com
[root@dm01db01 tmp]#
使用dcli的 -k 参数将秘钥添加到其他cell节点:
usage: dcli [options] [command]

options:
  --version            show program's version number and exit
  -c CELLS             comma-separated list of cells
  -d DESTFILE          destination directory or file
  -f FILE              files to be copied
  -g GROUPFILE         file containing list of cells
  -h, --help           show help message and exit
  -k                   push ssh key to cell's authorized_keys file
  -l USERID            user to login as on remote cells (default: celladmin)
  --maxlines=MAXLINES  limit output lines from a cell when in parallel
                       execution over multiple cells (default: 100000)
  -n                   abbreviate non-error output
  -r REGEXP            abbreviate output lines matching a regular expression
  -s SSHOPTIONS        string of options passed through to ssh
  --scp=SCPOPTIONS     string of options passed through to scp if different
                       from sshoptions
  --serial             serialize execution over the cells
  -t                   list target cells
  --unkey              drop keys from target cells' authorized_keys file
  -v                   print extra messages to stdout
  --vmstat=VMSTATOPS   vmstat command options
  -x EXECFILE          file to be copied and executed
[root@dm01db01 tmp]

[root@dm01db01 tmp]# cp /opt/oracle.SupportTools/onecommand/cell_group .
[root@dm01db01 tmp]# dcli -g cell_group -l root -k
The authenticity of host 'dm01cel01 (9.9.10.3)' can't be established.
RSA key fingerprint is bf:1e:72:a9:fc:23:9a:2c:e8:0d:5f:2a:ce:02:ea:a7.
Are you sure you want to continue connecting (yes/no)? yes
Warning: Permanently added 'dm01cel01,9.9.10.3' (RSA) to the list of known hosts.
root@dm01cel01's password:  这里输入root的口令
The authenticity of host 'dm01cel03 (9.9.10.5)' can't be established.
RSA key fingerprint is f7:b8:42:33:c4:9e:65:a6:69:fe:f4:b7:f7:dc:33:44.
Are you sure you want to continue connecting (yes/no)? yes
Warning: Permanently added 'dm01cel03,9.9.10.5' (RSA) to the list of known hosts.
root@dm01cel03's password: 这里输入root的口令
The authenticity of host 'dm01cel02 (9.9.10.4)' can't be established.
RSA key fingerprint is 09:b7:58:8b:d5:75:71:d5:8c:bc:f0:36:b5:9b:58:fd.
Are you sure you want to continue connecting (yes/no)? yes
Warning: Permanently added 'dm01cel02,9.9.10.4' (RSA) to the list of known hosts.
root@dm01cel02's password: 这里输入root的口令
dm01cel01: ssh key added
dm01cel02: ssh key added
dm01cel03: ssh key added
[root@dm01db01 tmp]#
检查个cell节点安全的信任关系是否正确配置:
[root@dm01db01 tmp]# dcli -g cell_group -l root 'hostname -i'
dm01cel01: 9.9.10.3
dm01cel02: 9.9.10.4
dm01cel03: 9.9.10.5
[root@dm01db01 tmp]#
4、检测磁盘组属性disk_repair_time配置(这是11g ASM的一个新特性,这里不单独赘述):
sqlplus> select dg.name,a.value from v$asm_diskgroup dg, v$asm_attribute a
         where dg.group_number=a.group_number and a.name='disk_repair_time';
NAME			       VALUE
------------------------------ ----------------------------------------
DATA_DG		       3.6h
DBFS_DG 		       3.6h
RECO_DG		       3.6h
修改这个主要是为了避免升级过程中达到缺省的3.6小时后在cell节点执行删除griddisk的操作。如果发生删除了griddisk的情况,那么,需要升级完成后手工添加这些磁盘组.
这个缺省值一般来说可以满足需求了。本次考虑升级满配的时间可能会超过3.6小时(这个是缺省值),因此将该值修改为10小时,等到升级完成后,可以讲该参数再改回3.6小时
SQL> alter diskgroup DATA_DM02 set attribute 'disk_repair_time'='10h';
Diskgroup altered.
SQL> alter diskgroup DBFS_DG set attribute 'disk_repair_time'='10h';
Diskgroup altered.
SQL> alter diskgroup RECO_DM02 set attribute 'disk_repair_time'='10h';
Diskgroup altered.
SQL>
SQL> select dg.name,a.value from v$asm_diskgroup dg, v$asm_attribute a
  2  where dg.group_number=a.group_number and a.name='disk_repair_time';

NAME                           VALUE
------------------------------ ------------------------------
DATA_DM02                      10h
DBFS_DG                        10h
RECO_DM02                      10h

SQL>
5、检查操作系统内核版本
因为Exadata当前的image是11.2.3.1.1,从image 11.2.3.2.1开始,Oracle推荐使用ORACLE UEK(Unbreakable Enterprise Kernel)内核。UEK内核根据Oracle databae和中间件等软件的特点优化后内核,是从Linux 2.6.32开始的。
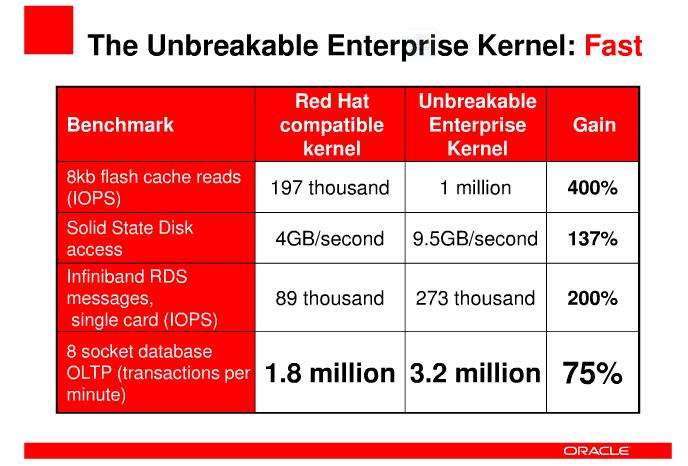
具体信息请参考:
http://www.oracle.com/us/technologies/linux/uek-r2-features-and-benefits-1555063.pdf
当然,db节点依然可以使用非UEK的内核(兼容RedHat Linux),但是这不是推荐的方式:
当前的内核版本:
[root@dm02db01 patch_11.2.3.2.1]# dcli -g all_group -l root 'uname -a'
dm02db01: Linux dm02db01.hrss 2.6.18-274.18.1.0.1.el5 #1 SMP Thu Feb 9 19:07:16 EST 2012 x86_64 x86_64 x86_64 GNU/Linux
dm02db02: Linux dm02db02.hrss 2.6.18-274.18.1.0.1.el5 #1 SMP Thu Feb 9 19:07:16 EST 2012 x86_64 x86_64 x86_64 GNU/Linux
dm02db03: Linux dm02db03.hrss 2.6.18-274.18.1.0.1.el5 #1 SMP Thu Feb 9 19:07:16 EST 2012 x86_64 x86_64 x86_64 GNU/Linux
dm02db04: Linux dm02db04.hrss 2.6.18-274.18.1.0.1.el5 #1 SMP Thu Feb 9 19:07:16 EST 2012 x86_64 x86_64 x86_64 GNU/Linux
dm02db05: Linux dm02db05.hrss 2.6.18-274.18.1.0.1.el5 #1 SMP Thu Feb 9 19:07:16 EST 2012 x86_64 x86_64 x86_64 GNU/Linux
dm02db06: Linux dm02db06.hrss 2.6.18-274.18.1.0.1.el5 #1 SMP Thu Feb 9 19:07:16 EST 2012 x86_64 x86_64 x86_64 GNU/Linux
dm02db07: Linux dm02db07.hrss 2.6.18-274.18.1.0.1.el5 #1 SMP Thu Feb 9 19:07:16 EST 2012 x86_64 x86_64 x86_64 GNU/Linux
dm02db08: Linux dm02db08.hrss 2.6.18-274.18.1.0.1.el5 #1 SMP Thu Feb 9 19:07:16 EST 2012 x86_64 x86_64 x86_64 GNU/Linux
dm02cel01: Linux dm02cel01.hrss 2.6.18-274.18.1.0.1.el5 #1 SMP Thu Feb 9 19:07:16 EST 2012 x86_64 x86_64 x86_64 GNU/Linux
dm02cel02: Linux dm02cel02.hrss 2.6.18-274.18.1.0.1.el5 #1 SMP Thu Feb 9 19:07:16 EST 2012 x86_64 x86_64 x86_64 GNU/Linux
dm02cel03: Linux dm02cel03.hrss 2.6.18-274.18.1.0.1.el5 #1 SMP Thu Feb 9 19:07:16 EST 2012 x86_64 x86_64 x86_64 GNU/Linux
dm02cel04: Linux dm02cel04.hrss 2.6.18-274.18.1.0.1.el5 #1 SMP Thu Feb 9 19:07:16 EST 2012 x86_64 x86_64 x86_64 GNU/Linux
dm02cel05: Linux dm02cel05.hrss 2.6.18-274.18.1.0.1.el5 #1 SMP Thu Feb 9 19:07:16 EST 2012 x86_64 x86_64 x86_64 GNU/Linux
dm02cel06: Linux dm02cel06.hrss 2.6.18-274.18.1.0.1.el5 #1 SMP Thu Feb 9 19:07:16 EST 2012 x86_64 x86_64 x86_64 GNU/Linux
dm02cel07: Linux dm02cel07.hrss 2.6.18-274.18.1.0.1.el5 #1 SMP Thu Feb 9 19:07:16 EST 2012 x86_64 x86_64 x86_64 GNU/Linux
dm02cel08: Linux dm02cel08.hrss 2.6.18-274.18.1.0.1.el5 #1 SMP Thu Feb 9 19:07:16 EST 2012 x86_64 x86_64 x86_64 GNU/Linux
dm02cel09: Linux dm02cel09.hrss 2.6.18-274.18.1.0.1.el5 #1 SMP Thu Feb 9 19:07:16 EST 2012 x86_64 x86_64 x86_64 GNU/Linux
dm02cel10: Linux dm02cel10.hrss 2.6.18-274.18.1.0.1.el5 #1 SMP Thu Feb 9 19:07:16 EST 2012 x86_64 x86_64 x86_64 GNU/Linux
dm02cel11: Linux dm02cel11.hrss 2.6.18-274.18.1.0.1.el5 #1 SMP Thu Feb 9 19:07:16 EST 2012 x86_64 x86_64 x86_64 GNU/Linux
dm02cel12: Linux dm02cel12.hrss 2.6.18-274.18.1.0.1.el5 #1 SMP Thu Feb 9 19:07:16 EST 2012 x86_64 x86_64 x86_64 GNU/Linux
dm02cel13: Linux dm02cel13.hrss 2.6.18-274.18.1.0.1.el5 #1 SMP Thu Feb 9 19:07:16 EST 2012 x86_64 x86_64 x86_64 GNU/Linux
dm02cel14: Linux dm02cel14.hrss 2.6.18-274.18.1.0.1.el5 #1 SMP Thu Feb 9 19:07:16 EST 2012 x86_64 x86_64 x86_64 GNU/Linux
[root@dm02db01 patch_11.2.3.2.1]#
6、检查操作系统版本
[root@dm02db01 patch_11.2.3.2.1]# dcli -g all_group -l root 'cat /etc/oracle-release'
dm02db01: Oracle Linux Server release 5.7
dm02db02: Oracle Linux Server release 5.7
。。。。。。。。。
dm02cel01: Oracle Linux Server release 5.7
dm02cel02: Oracle Linux Server release 5.7
。。。。。。。。。。。。。。
dm02cel14: Oracle Linux Server release 5.7
[root@dm02db01 patch_11.2.3.2.1]#
7、检查image版本
[root@dm02db01 patch_11.2.3.2.1]# dcli -g all_group -l root 'imageinfo'
dm02db01:
dm02db01: Kernel version: 2.6.18-274.18.1.0.1.el5 #1 SMP Thu Feb 9 19:07:16 EST 2012 x86_64
dm02db01: Image version: 11.2.3.1.1.120607
dm02db01: Image activated: 2012-08-08 15:03:41 +0800
dm02db01: Image status: success
dm02db01: System partition on device: /dev/mapper/VGExaDb-LVDbSys1
dm02db01:
dm02db02:
dm02db02: Kernel version: 2.6.18-274.18.1.0.1.el5 #1 SMP Thu Feb 9 19:07:16 EST 2012 x86_64
dm02db02: Image version: 11.2.3.1.1.120607
dm02db02: Image activated: 2012-08-08 13:04:27 +0800
dm02db02: Image status: success
dm02db02: System partition on device: /dev/mapper/VGExaDb-LVDbSys1
dm02db02:
dm02db03:
……….
dm02cel01:
dm02cel01: Kernel version: 2.6.18-274.18.1.0.1.el5 #1 SMP Thu Feb 9 19:07:16 EST 2012 x86_64
dm02cel01: Cell rpm version: cell-11.2.3.1.1_LINUX.X64_120607-1
dm02cel01:
dm02cel01: Active image version: 11.2.3.1.1.120607
dm02cel01: Active image activated: 2012-08-08 18:40:45 +0800
dm02cel01: Active image status: success
dm02cel01: Active system partition on device: /dev/md5
dm02cel01: Active software partition on device: /dev/md7
dm02cel01:
dm02cel01: In partition rollback: Impossible
dm02cel01:
dm02cel01: Cell boot usb partition: /dev/sdm1
dm02cel01: Cell boot usb version: 11.2.3.1.1.120607
dm02cel01:
dm02cel01: Inactive image version: undefined
dm02cel01: Rollback to the inactive partitions: Impossible
dm02cel02:
…….
dm02cel14:
dm02cel14: Kernel version: 2.6.18-274.18.1.0.1.el5 #1 SMP Thu Feb 9 19:07:16 EST 2012 x86_64
dm02cel14: Cell rpm version: cell-11.2.3.1.1_LINUX.X64_120607-1
dm02cel14:
dm02cel14: Active image version: 11.2.3.1.1.120607
dm02cel14: Active image activated: 2012-08-08 14:13:24 +0800
dm02cel14: Active image status: success
dm02cel14: Active system partition on device: /dev/md5
dm02cel14: Active software partition on device: /dev/md7
dm02cel14:
dm02cel14: In partition rollback: Impossible
dm02cel14:
dm02cel14: Cell boot usb partition: /dev/sdm1
dm02cel14: Cell boot usb version: 11.2.3.1.1.120607
dm02cel14:
dm02cel14: Inactive image version: undefined
dm02cel14: Rollback to the inactive partitions: Impossible
[root@dm02db01 patch_11.2.3.2.1]#

[root@dm02db01 patch_11.2.3.2.1]# dcli -g all_group -l root 'imagehistory'
dm02db01: Version                              : 11.2.3.1.1.120607
dm02db01: Image activation date                : 2012-08-08 15:03:41 +0800
dm02db01: Imaging mode                         : fresh
dm02db01: Imaging status                       : success
dm02db01:
dm02db02: Version                              : 11.2.3.1.1.120607
dm02db02: Image activation date                : 2012-08-08 13:04:27 +0800
dm02db02: Imaging mode                         : fresh
dm02db02: Imaging status                       : success
…………..
dm02cel01: Version                              : 11.2.3.1.1.120607
dm02cel01: Image activation date                : 2012-08-08 18:40:45 +0800
dm02cel01: Imaging mode                         : fresh
dm02cel01: Imaging status                       : success
dm02cel01:
dm02cel02: Version                              : 11.2.3.1.1.120607
dm02cel02: Image activation date                : 2012-08-08 18:40:44 +0800
dm02cel02: Imaging mode                         : fresh
dm02cel02: Imaging status                       : success
dm02cel02:
。。。。。。。。。。。
8、检查ofa版本
[root@dm02db01 patch_11.2.3.2.1]# dcli -g all_group -l root 'rpm -qa | grep ofa'
dm02db01: ofa-2.6.18-274.18.1.0.1.el5-1.5.1-4.0.58
dm02db02: ofa-2.6.18-274.18.1.0.1.el5-1.5.1-4.0.58
。。。。。。。。。。。。
dm02cel01: ofa-2.6.18-274.18.1.0.1.el5-1.5.1-4.0.58
dm02cel02: ofa-2.6.18-274.18.1.0.1.el5-1.5.1-4.0.58
。。。。。。。。。。。。。。。。。。
dm02cel14: ofa-2.6.18-274.18.1.0.1.el5-1.5.1-4.0.58
[root@dm02db01 patch_11.2.3.2.1]#
9、检测硬件设备类型:
[root@dm02db01 patch_11.2.3.2.1]# dcli -g all_group -l root 'dmidecode -s system-product-name'
dm02db01: SUN FIRE X4170 M2 SERVER
dm02db02: SUN FIRE X4170 M2 SERVER
。。。。。
dm02cel01: SUN FIRE X4270 M2 SERVER
dm02cel02: SUN FIRE X4270 M2 SERVER
……
dm02cel14: SUN FIRE X4270 M2 SERVER
[root@dm02db01 patch_11.2.3.2.1]#
10、检查cell节点日志信息
[root@dm02db01 patch_11.2.3.2.1]# dcli -g cell_group -l root "cellcli -e list alerthistory"
。。。。。。。。。
如果有严重告警等信息,需要解决问题后才能升级。
11、检测是否存在offline状态的grid盘
[root@dm02db01 patch_11.2.3.2.1]# dcli -g cell_group -l root "cellcli -e "LIST GRIDDISK ATTRIBUTES name WHERE asmdeactivationoutcome != 'Yes'" "
[root@dm02db01 patch_11.2.3.2.1]#
12、确认infiniband 交换机firmware已经是最新的1.3.3.2
参考MOS NOTES 888828.1
13、验证cell节点网络配置信息与cell.conf保持一致
[root@dm02db01 ~]# dcli -g cell_group -l root /opt/oracle.cellos/ipconf -verify
dm02cel01: Verifying of Exadata configuration file /opt/oracle.cellos/cell.conf
dm02cel01: Done. Configuration file /opt/oracle.cellos/cell.conf passed all verification checks
dm02cel02: Verifying of Exadata configuration file /opt/oracle.cellos/cell.conf
dm02cel02: Done. Configuration file /opt/oracle.cellos/cell.conf passed all verification checks
。。。。。。。。。。。
dm02cel14: Verifying of Exadata configuration file /opt/oracle.cellos/cell.conf
dm02cel14: Done. Configuration file /opt/oracle.cellos/cell.conf passed all verification checks
[root@dm02db01 ~]#
二、升级CELL节点的image
升级和回滚CELL节点的image可以使用滚动和滚动的方式:
滚动升级可以实现零宕机时间,如果出问题也只是影响出问题的一个cell节点。缺点是升级时间比较长,要一台一台做,比如一个CELL升级大概需要2小时,那么一个满配的Exadata就需要2*14=28小时,比较熬人…………
如果客户可以配置一个应急库(比如使用ADG),那么我一般都推荐客户使用非滚动方式,这样,一个满配的Exadata升级一遍所有的CELL也就是两个多小时(含前期准备和检查的时间)。
为了节省时间,本次推荐客户采用非滚动方式(配置ADG的过程这里就不赘述了)。
1、 停止所有的数据库
srvctl stop database -d your_database_name
2、停止所有节点的crs:
dcli -g dbs_group -l root "/u01/app/11.2.0/grid/bin/crsctl stop crs -f"
3、检查是否还有grid用户进程:
dcli -g dbs_group -l root "ps -ef | grep grid"
4、停止所有cell服务(cellsrv, ms, rs):
dcli -g cell_group -l root "cellcli -e alter cell shutdown services all"
5、用户root以ssh方式登陆db01节点,不能通过KVM和串口会话进行升级
# echo $consoletype
6、解压cell image的介质
# unzip p14522699_112321_Linux-x86-64.zip
7、清理之前patchmgr运行后的环境,类似AIX环境打patch时执行的命令(具体叫啥我忘记了,readme上有……)
[root@dm02db01 patch_11.2.3.2.1.130109]# ./patchmgr -cells cell_group -cleanup
Linux dm02db01.hrss 2.6.18-274.18.1.0.1.el5 #1 SMP Thu Feb 9 19:07:16 EST 2012 x86_64 x86_64 x86_64 GNU/Linux

2013-05-23 11:40:18 :DONE: Cleanup

[root@dm02db01 patch_11.2.3.2.1.130109]#
8、预安装检查:
[root@dm02db01 patch_11.2.3.2.1.130109]# ./patchmgr -cells cell_group -patch_check_prereq
Linux dm02db01.hrss 2.6.18-274.18.1.0.1.el5 #1 SMP Thu Feb 9 19:07:16 EST 2012 x86_64 x86_64 x86_64 GNU/Linux

2013-05-23 11:40:44        :Working: DO: Check cells have ssh equivalence for root user. Up to 10 seconds per cell ...
2013-05-23 11:41:00        :SUCCESS: DONE: Check cells have ssh equivalence for root user.
2013-05-23 11:41:00        :Working: DO: Check space and state of Cell services on target cells. Up to 1 minute ...
2013-05-23 11:41:46        :SUCCESS: DONE: Check space and state of Cell services on target cells.
2013-05-23 11:41:46        :Working: DO: Copy, extract prerequisite check archive to cells. If required start md11 mismatched partner size correction. Up to 40 minutes ...
2013-05-23 11:42:09 Wait correction of degraded md11 due to md partner size mismatch. Up to 30 minutes.


2013-05-23 11:42:25        :SUCCESS: DONE: Copy, extract prerequisite check archive to cells. If required start md11 mismatched partner size correction.
2013-05-23 11:42:25        :Working: DO: Check prerequisites on all cells. Up to 2 minutes ...
2013-05-23 11:43:05        :SUCCESS: DONE: Check prerequisites on all cells.

[root@dm02db01 patch_11.2.3.2.1.130109]#
9、非滚动升级
我一般是开启一个vncserver在后台执行,如果网络稳定的话,可以开一个直接在crt中运行:
本次没看日志,闭眼升级不回滚,o(∩_∩)o 哈哈 *^_^*
下面的是以前的执行过程中的记录信息:
[root@dm01db01 patch_11.2.3.2.1.130109]# ./patchmgr -cells cell_group -patch
Linux dm01db01.scq.com 2.6.32-400.1.1.el5uek #1 SMP Mon Jun 25 20:25:08 EDT 2012 x86_64 x86_64 x86_64 GNU/Linux
NOTE Cells will reboot during the patch or rollback process.
NOTE For non-rolling patch or rollback, ensure all ASM instances using
NOTE the cells are shut down for the duration of the patch or rollback.
NOTE For rolling patch or rollback, ensure all ASM instances using
。。。。。。。。。。。。。
下面的是以前的升级过程中的信息:
[root@dm01db01 patch_11.2.3.2.1.130109]# less -rf patchmgr.stdout

================PatchMgr run started Tue Apr  2 12:42:39 CST 2013 ===========
2013-04-02 12:42:40 :DONE: Cleanup
================PatchMgr run ended Tue Apr  2 12:42:40 CST 2013 ===========


================PatchMgr run started Tue Apr  2 12:42:51 CST 2013 ===========
2013-04-02 12:42:52 :DONE: Cleanup
================PatchMgr run ended Tue Apr  2 12:42:52 CST 2013 ===========


================PatchMgr run started Tue Apr  2 12:43:01 CST 2013 ===========
2013-04-02 12:43:01        :Working: DO: Check cells have ssh equivalence for root user. Up to 10 seconds per cell ...
2013-04-02 12:43:01 ++++++++++++++++++ Logs so far follow ++++++++++
2013-04-02 12:43:02        :SUCCESS: DONE: Check cells have ssh equivalence for root user.
2013-04-02 12:43:02        :Working: DO: Check space and state of Cell services on target cells. Up to 1 minute ...
2013-04-02 12:43:23 ++++++++++++++++++ Logs so far follow ++++++++++
dm01cel01: [INFO] 2013-04-02 12:43:05 patchmgr launch attempt from dm01db01.scq.com_9.9.10.1_tmp_patch_11.2.3.2.1.130109.
dm01cel01: [INFO] 2013-04-02 12:43:05 dostep called: prechk:1457 patch_prereq -no-auto-rollback non_rolling 600 3600 900 3600 default noforce
dm01cel01: [INFO] 2013-04-02 12:43:05 patchmgr launched from dm01db01.scq.com_9.9.10.1_tmp_patch_11.2.3.2.1.130109
dm01cel01: [DEBUG] BEGIN Various markers 2013-04-02 12:43:23
dm01cel01: -rw-r--r-- 1 root root 17 Feb 13 16:37 /.hwfwchk_save.post.imaging
dm01cel01: [DEBUG] End Various markers
dm01cel01: _EXIT_PASS_Cell dm01cel01 9.9.10.3 2013-04-02 12:43:23:
dm01cel02: [INFO] 2013-04-02 12:43:05 patchmgr launch attempt from dm01db01.scq.com_9.9.10.1_tmp_patch_11.2.3.2.1.130109.
。。。。。。。。。
2013-04-02 12:48:29 2 of 5 :Working: DO: Waiting to finish pre-reboot patch actions. Cells will remain up. Up to 45 minutes ...
2013-04-02 12:49:29 Wait for patch pre-reboot procedures

||||| Minutes left 045///// Minutes left 045----- Minutes left 045\\\\\ Minutes left 045||||| Minutes left 045||||| Minutes left 045///// Minutes left 045----- Minutes left 045\\\\\ Minutes left 045||||| Minutes left 045||||| Minutes left 045///// Minutes left 045----- Minutes left 045\\\\\ Minutes left 045||||| Minutes left 045||||| Minutes left 045///// Minutes left 045----- Minutes left 045\\\\\ Minutes left 045||||| Minutes left 045||||| Minutes left 045///// Minutes left 045----- Minutes left 045\\\\\ Minutes left 045||||| Minutes left 045||||| Minutes left 045///// Minutes left 045----- Minutes left 045\\\\\ Minutes left 045||||| Minutes left 045||||| Minutes left 045///// Minutes left 045----- Minutes left 045\\\\\ Minutes left 045||||| Minutes left 045||||| Minutes left 045///// Minutes left 045----- Minutes left 045\\\\\ Minutes left 045||||| Minutes left 045||||| Minutes left 045///// Minutes left 045----- Minutes left 045\\\\\ Minutes left 045||||| Minutes left 045||||| Minutes left 045……….
这个界面如果使用vncserver来执行,就会不会有刷屏的效果,这个看下升级的脚本就会知道。
升级过程中,每个节点都会有相应的log:
[root@dm02db01 patch_11.2.3.2.1.130109]# more dm02cel07.log
dm02cel07: [INFO] 2013-05-23 11:41:23 patchmgr launch attempt from dm02db01.lunar_152.26.6.11_tmp_patch_11.2.3.2.1_cell_ima
ge_patch_11.2.3.2.1.130109.
dm02cel07: [INFO] 2013-05-23 11:41:23 dostep called: prechk:1457 patch_prereq -no-auto-rollback non_rolling 600 3600 900 3
600 default noforce
dm02cel07: [INFO] 2013-05-23 11:41:23 patchmgr launched from dm02db01.lunar_152.26.6.11_tmp_patch_11.2.3.2.1_cell_image_pat
ch_11.2.3.2.1.130109
dm02cel07: [DEBUG] BEGIN Various markers 2013-05-23 11:41:37
dm02cel07: -rw-r--r-- 1 root root 20 Aug  8  2012 /.hwfwchk_save.post.imaging
dm02cel07: [DEBUG] End Various markers
dm02cel07: _EXIT_PASS_Cell dm02cel07 172.20.6.25 2013-05-23 11:41:37:
dm02cel07:
dm02cel07: _EXIT_PASS_Cell dm02cel07 172.20.6.25
。。。。。。。。。。。。
升级过程中,可以使用 less -rf patchmgr.stdout 命令进行后台监控,还可以在cell上使用 tail -f /root/_patch_hctap_/_p_/wait_out 监控每一个cell的patch情况。
三、升级计算节点image
1、备份每个节点的GI和DB软件(也可以使用MOS上的dbserver_backup.sh,该脚本使用使用LVM快照进行系统备份)
2、检查磁盘空间
[root@dm02db01 db_image]# dcli -g dbs_group -l root 'df -h /boot'
dm02db01: Filesystem            Size  Used Avail Use% Mounted on
dm02db01: /dev/sda1             502M   30M  447M   7% /boot
dm02db02: Filesystem            Size  Used Avail Use% Mounted on
dm02db02: /dev/sda1             502M   30M  447M   7% /boot
dm02db03: Filesystem            Size  Used Avail Use% Mounted on
dm02db03: /dev/sda1             502M   30M  447M   7% /boot
dm02db04: Filesystem            Size  Used Avail Use% Mounted on
dm02db04: /dev/sda1             502M   30M  447M   7% /boot
dm02db05: Filesystem            Size  Used Avail Use% Mounted on
dm02db05: /dev/sda1             502M   30M  447M   7% /boot
dm02db06: Filesystem            Size  Used Avail Use% Mounted on
dm02db06: /dev/sda1             502M   30M  447M   7% /boot
dm02db07: Filesystem            Size  Used Avail Use% Mounted on
dm02db07: /dev/sda1             502M   30M  447M   7% /boot
dm02db08: Filesystem            Size  Used Avail Use% Mounted on
dm02db08: /dev/sda1             502M   30M  447M   7% /boot
[root@dm02db01 db_image]#
3、清除yum缓存:
[root@dm02db01 db_image]# dcli -g dbs_group -l root 'yum clean all'
dm02db01: Cleaning up Everything
dm02db02: Cleaning up Everything
dm02db03: Cleaning up Everything
dm02db04: Cleaning up Everything
dm02db05: Cleaning up Everything
dm02db06: Cleaning up Everything
dm02db07: Cleaning up Everything
dm02db08: Cleaning up Everything
[root@dm02db01 db_image]#
4、解压介质
[root@dm02db01 db_image]# unzip p16432033_112321_Linux-x86-64.zip
5、配置yum源
[root@dm02db01 patch_11.2.3.2.1]# dcli -g dbs_group -l root "mkdir -p /mnt/iso/yum/unknown/EXADATA/dbserver/11.2/latest"
在所有db节点的/etc/yum.repos.d/Exadata-computenode.repo中添加:
[exadata_dbserver_11.2_x86_64_latest]
name=Oracle Exadata DB server 11.2 Linux $releasever - $basearch - latest
baseurl=file:///mnt/iso/yum/unknown/EXADATA/dbserver/11.2/latest/x86_64
gpgcheck=1
enabled=0
挂载yum源:
[root@dm02db01 db_image]# dcli -g dbs_group -l root "mount -o loop /tmp/patch_11.2.3.2.1/db_image/112_latest_repo_130302.iso /mnt/iso/yum/unknown/EXADATA/dbserver/11.2/latest"


[root@dm02db01 db_image]# dcli -g dbs_group -l root 'ls -lrt /mnt/iso/yum/unknown/EXADATA/dbserver/11.2/latest'
dm02db01: total 78
dm02db01: dr-xr-xr-x 5 root root 79872 Mar  5 22:32 x86_64
dm02db02: total 78
dm02db02: dr-xr-xr-x 5 root root 79872 Mar  5 22:32 x86_64
dm02db03: total 78
dm02db03: dr-xr-xr-x 5 root root 79872 Mar  5 22:32 x86_64
dm02db04: total 78
dm02db04: dr-xr-xr-x 5 root root 79872 Mar  5 22:32 x86_64
dm02db05: total 78
dm02db05: dr-xr-xr-x 5 root root 79872 Mar  5 22:32 x86_64
dm02db06: total 78
dm02db06: dr-xr-xr-x 5 root root 79872 Mar  5 22:32 x86_64
dm02db07: total 78
dm02db07: dr-xr-xr-x 5 root root 79872 Mar  5 22:32 x86_64
dm02db08: total 78
dm02db08: dr-xr-xr-x 5 root root 79872 Mar  5 22:32 x86_64
[root@dm02db01 db_image]#
升级计算节点:
这个过程会线进行一些列检查,然后更新相关的动态库:
[root@dm02db01 ~]# yum --enablerepo=exadata_dbserver_11.2_x86_64_latest update
exadata_dbserver_11.2_x86_64_latest                                                                | 1.9 kB     00:00
Excluding Packages in global exclude list
Finished
Setting up Update Process
Resolving Dependencies
--> Running transaction check
---> Package OpenIPMI.x86_64 0:2.0.16-13.el5_8 set to be updated
---> Package OpenIPMI-libs.x86_64 0:2.0.16-13.el5_8 set to be updated
---> Package acl.x86_64 0:2.2.39-8.el5 set to be updated
---> Package audit.x86_64 0:1.8-2.el5 set to be updated
---> Package audit-libs.x86_64 0:1.8-2.el5 set to be updated
---> Package audit-libs-python.x86_64 0:1.8-2.el5 set to be updated
---> Package bind-libs.x86_64 30:9.3.6-20.P1.el5_8.5 set to be updated
---> Package bind-utils.x86_64 30:9.3.6-20.P1.el5_8.5 set to be updated
---> Package binutils.x86_64 0:2.17.50.0.6-20.el5_8.3 set to be updated
---> Package busybox.x86_64 1:1.2.0-13.el5 set to be updated

…………………………
Replaced:
  kernel-headers.x86_64 0:2.6.18-274.18.1.0.1.el5

Complete!
[root@dm02db01 ~]#
Remote broadcast message (Thu May 23 13:55:11 2013):

Exadata post install steps started.
It may take up to 2 minutes.
The db node will be rebooted upon successful completion.
Update的过程大概不足10分钟,之后,系统会自动重启N次,大概30~40分钟后,升级完成,系统最后一次启动会正常启动(重启N次的过程中,可以通过ILOM观察到系统的N次重启活动)。
所有的节点可以并行做。
四、给GI 和 DB 打 BP 16
1,使用最新的或者相应的OPatch:
本次使用 p6880880_112000_Linux-x86-64.zip
2、解压OPatch(grid和oracle都要):
[grid@dm02db01 bp16]$ unzip p6880880_112000_Linux-x86-64.zip -d /u01/app/11.2.0.3/grid/
Archive:  p6880880_112000_Linux-x86-64.zip
   creating: /u01/app/11.2.0.3/grid/OPatch/oplan/
  inflating: /u01/app/11.2.0.3/grid/OPatch/oplan/README.html
  inflating: /u01/app/11.2.0.3/grid/OPatch/oplan/README.txt
   creating: /u01/app/11.2.0.3/grid/OPatch/oplan/jlib/
  inflating: /u01/app/11.2.0.3/grid/OPatch/oplan/jlib/oplan.jar
  inflating: /u01/app/11.2.0.3/grid/OPatch/oplan/jlib/oracle.oplan.classpath.jar
  inflating: /u01/app/11.2.0.3/grid/OPatch/oplan/jlib/automation.jar
  inflating: /u01/app/11.2.0.3/grid/OPatch/oplan/jlib/OsysModel.jar
  inflating: /u01/app/11.2.0.3/grid/OPatch/oplan/jlib/EMrepoDrivers.jar
  inflating: /u01/app/11.2.0.3/grid/OPatch/oplan/jlib/Validation.jar
  inflating: /u01/app/11.2.0.3/grid/OPatch/oplan/jlib/ValidationRules.jar
  inflating: /u01/app/11.2.0.3/grid/OPatch/oplan/jlib/osysmodel-utils.jar
  inflating: /u01/app/11.2.0.3/grid/OPatch/oplan/jlib/CRSProductDriver.jar
   creating: /u01/app/11.2.0.3/grid/OPatch/oplan/jlib/apache-commons/
  inflating: /u01/app/11.2.0.3/grid/OPatch/oplan/jlib/apache-commons/commons-cli-1.0.jar
   creating: /u01/app/11.2.0.3/grid/OPatch/oplan/jlib/jaxb/
  inflating: /u01/app/11.2.0.3/grid/OPatch/oplan/jlib/jaxb/activation.jar
  inflating: /u01/app/11.2.0.3/grid/OPatch/oplan/jlib/jaxb/jaxb-api.jar
  inflating: /u01/app/11.2.0.3/grid/OPatch/oplan/jlib/jaxb/jaxb-impl.jar
  inflating: /u01/app/11.2.0.3/grid/OPatch/oplan/jlib/jaxb/jsr173_1.0_api.jar
  inflating: /u01/app/11.2.0.3/grid/OPatch/oplan/oplan
   creating: /u01/app/11.2.0.3/grid/OPatch/docs/
  inflating: /u01/app/11.2.0.3/grid/OPatch/docs/FAQ
  inflating: /u01/app/11.2.0.3/grid/OPatch/docs/Users_Guide.txt
  inflating: /u01/app/11.2.0.3/grid/OPatch/docs/Prereq_Users_Guide.txt
   creating: /u01/app/11.2.0.3/grid/OPatch/jlib/
   creating: /u01/app/11.2.0.3/grid/OPatch/jlib/fa/
  inflating: /u01/app/11.2.0.3/grid/OPatch/jlib/fa/oracle.opatch.fa.classpath.jar
  inflating: /u01/app/11.2.0.3/grid/OPatch/jlib/fa/oracle.opatch.fa.classpath.unix.jar
  inflating: /u01/app/11.2.0.3/grid/OPatch/jlib/fa/oracle.opatch.fa.classpath.windows.jar
  inflating: /u01/app/11.2.0.3/grid/OPatch/jlib/opatch.jar
  inflating: /u01/app/11.2.0.3/grid/OPatch/jlib/opatchsdk.jar
  inflating: /u01/app/11.2.0.3/grid/OPatch/jlib/oracle.opatch.classpath.jar
  inflating: /u01/app/11.2.0.3/grid/OPatch/jlib/oracle.opatch.classpath.unix.jar
  inflating: /u01/app/11.2.0.3/grid/OPatch/jlib/oracle.opatch.classpath.windows.jar
   creating: /u01/app/11.2.0.3/grid/OPatch/opatchprereqs/
   creating: /u01/app/11.2.0.3/grid/OPatch/opatchprereqs/opatch/
  inflating: /u01/app/11.2.0.3/grid/OPatch/opatchprereqs/opatch/opatch_prereq.xml
  inflating: /u01/app/11.2.0.3/grid/OPatch/opatchprereqs/opatch/rulemap.xml
  inflating: /u01/app/11.2.0.3/grid/OPatch/opatchprereqs/opatch/runtime_prereq.xml
   creating: /u01/app/11.2.0.3/grid/OPatch/opatchprereqs/oui/
  inflating: /u01/app/11.2.0.3/grid/OPatch/opatchprereqs/oui/knowledgesrc.xml
  inflating: /u01/app/11.2.0.3/grid/OPatch/opatchprereqs/prerequisite.properties
   creating: /u01/app/11.2.0.3/grid/OPatch/crs/
   creating: /u01/app/11.2.0.3/grid/OPatch/crs/log/
  inflating: /u01/app/11.2.0.3/grid/OPatch/crs/auto_patch.pl
  inflating: /u01/app/11.2.0.3/grid/OPatch/crs/installPatch.excl
  inflating: /u01/app/11.2.0.3/grid/OPatch/crs/patch112.pl
  inflating: /u01/app/11.2.0.3/grid/OPatch/crs/patch11202.pl
  inflating: /u01/app/11.2.0.3/grid/OPatch/crs/patch11203.pl
  inflating: /u01/app/11.2.0.3/grid/OPatch/opatch
  inflating: /u01/app/11.2.0.3/grid/OPatch/opatch.bat
  inflating: /u01/app/11.2.0.3/grid/OPatch/opatch.pl
  inflating: /u01/app/11.2.0.3/grid/OPatch/opatch.ini
  inflating: /u01/app/11.2.0.3/grid/OPatch/opatchdiag
  inflating: /u01/app/11.2.0.3/grid/OPatch/opatchdiag.bat
  inflating: /u01/app/11.2.0.3/grid/OPatch/emdpatch.pl
  inflating: /u01/app/11.2.0.3/grid/OPatch/README.txt
   creating: /u01/app/11.2.0.3/grid/OPatch/ocm/
   creating: /u01/app/11.2.0.3/grid/OPatch/ocm/bin/
  inflating: /u01/app/11.2.0.3/grid/OPatch/ocm/bin/emocmrsp
   creating: /u01/app/11.2.0.3/grid/OPatch/ocm/doc/
   creating: /u01/app/11.2.0.3/grid/OPatch/ocm/lib/
  inflating: /u01/app/11.2.0.3/grid/OPatch/ocm/lib/emocmclnt-14.jar
  inflating: /u01/app/11.2.0.3/grid/OPatch/ocm/lib/emocmclnt.jar
  inflating: /u01/app/11.2.0.3/grid/OPatch/ocm/lib/emocmcommon.jar
  inflating: /u01/app/11.2.0.3/grid/OPatch/ocm/lib/http_client.jar
  inflating: /u01/app/11.2.0.3/grid/OPatch/ocm/lib/jcert.jar
  inflating: /u01/app/11.2.0.3/grid/OPatch/ocm/lib/jnet.jar
  inflating: /u01/app/11.2.0.3/grid/OPatch/ocm/lib/jsse.jar
  inflating: /u01/app/11.2.0.3/grid/OPatch/ocm/lib/log4j-core.jar
  inflating: /u01/app/11.2.0.3/grid/OPatch/ocm/lib/osdt_core3.jar
  inflating: /u01/app/11.2.0.3/grid/OPatch/ocm/lib/osdt_jce.jar
  inflating: /u01/app/11.2.0.3/grid/OPatch/ocm/lib/regexp.jar
  inflating: /u01/app/11.2.0.3/grid/OPatch/ocm/lib/xmlparserv2.jar
 extracting: /u01/app/11.2.0.3/grid/OPatch/ocm/ocm.zip
  inflating: /u01/app/11.2.0.3/grid/OPatch/ocm/ocm_platforms.txt
[grid@dm02db01 bp16]$
2、配置OCM
[grid@dm02db01 bp16]$ORACLE_HOME/OPatch/ocm/bin/emocmrsp
3、分别使用oracle和grid都检查一下OPatch的版本是否正确:
$ORACLE_HOME/OPatch/opatch version
4、分别使用oracle和grid都检查一下当前patch信息
$ORACLE_HOME/OPatch/opatch lsinventory -detail -oh $ORACLE_HOME
5、For Grid Infrastructure Home, as home user:
$ORACLE_HOME/OPatch/opatch prereq CheckConflictAgainstOHWithDetail -phBaseDir /tmp/bp16/16233552/16233552
$ORACLE_HOME/OPatch/opatch prereq CheckConflictAgainstOHWithDetail -phBaseDir /tmp/bp16/16233552/16355082
$ORACLE_HOME/OPatch/opatch prereq CheckConflictAgainstOHWithDetail -phBaseDir /tmp/bp16/16233552/16401300
6、For Database home, as home user:
$ORACLE_HOME/OPatch/opatch prereq CheckConflictAgainstOHWithDetail -phBaseDir /tmp/bp16/16233552/16233552
$ORACLE_HOME/OPatch/opatch prereq CheckConflictAgainstOHWithDetail -phBaseDir /tmp/bp16/16233552/16355082/custom/server/16355082
7、For Grid Infrastructure Home, as home user:
$ORACLE_HOME/OPatch/opatch prereq CheckSystemSpace -phBaseDir /tmp/bp16/16233552/16233552
$ORACLE_HOME/OPatch/opatch prereq CheckSystemSpace -phBaseDir /tmp/bp16/16233552/16355082
$ORACLE_HOME/OPatch/opatch prereq CheckSystemSpace -phBaseDir /tmp/bp16/16233552/16401300
8、For Database home, as home user:
$ORACLE_HOME/OPatch/opatch prereq CheckSystemSpace -phBaseDir /tmp/bp16/16233552/16233552
$ORACLE_HOME/OPatch/opatch prereq CheckSystemSpace -phBaseDir /tmp/bp16/16233552/16355082/custom/server/16355082
9、使用auto打patch
[root@dm02db01 bp16]#ORACLE_HOME/OPatch/opatch auto /tmp/bp16/16233552
本次打patch的时候,遇到了3个节点的crs不能正常shutdown,导apply patch失败(是因为之前手工配置的network2服务使用的eth3网卡引起的……),采用auto对这3个节点进行了回滚,然后重新使用auto 打patch,最终完美解决,o(∩_∩)o 哈哈。
su - root
ifdown eth3
/u01/app/11.2.0.3/grid/OPatch/opatch auto /tmp/bp16/16233552 –rollback







BP的升级还没最终完成,还需要一些联机执行的脚本,因为是DG,这个是备库,等到切换为主库后,就可以执行了……那时再补充进来……
犀利~终于开了自己的博客啦~